SMS:Merge 2D Meshes
Merge Command
Two meshes can be merged to form a new mesh which will be called "Merged" (or "Merged (##)" if that name is already used) in the Project Explorer. No model data will be transferred, and the type of the new mesh will be the same as the default mesh model set in the Preferences regardless of the model type of the meshes used in the merge (to check the Preferences, go to Edit | Preferences... and check the Defaults tab for the Default 2D Mesh Model). The Merge 2D Meshes command is accessed by selecting two meshes, right-clicking, and selecting Merge 2D Meshes. This will bring up the Mesh 2D Merge Options dialog.
If the two meshes being merged overlap, SMS will report this and give the option of aborting the merge.
When merging two meshes that overlap, SMS includes all nodes from both meshes, and forces one of the previous mesh's boundaries to be honored in the merged mesh. Any disjoint nodes in the meshes will be deleted.
Mesh 2D Merge Options

The Mesh 2D Merge Options dialog has the following options to determine whitch method SMS will use in merging 2D meshes.
Merge method
- "Automatic" – Checks for overlapping elements in the meshes to be merged. If no overlap is found, then merging will be done the same as if "Non-overlapping" was chosen. Otherwise, the "Overlapping" merge will be performed. Checking for overlapping elements can be time consuming for large meshes.
- "Overlapping" – Safely merges meshes with overlapping elements.
- "Non-overlapping" – The fastest merge method. However, if this method is used with meshes that overlap, the resulting merged mesh will be invalid.
Base mesh
- When merging meshes, one mesh will be the principal mesh. The principal mesh is the mesh that is considered the mesh that the other mesh will be added to. In the case of an overlapping merge, the boundary conditions of the principal mesh are the ones that are preserved.
Merging with Priority
One common feature that may be desired would be to only include nodes from one of the two meshes in the overlap region. This feature is under consideration. To get this result with current functionality, the following steps may be followed:
- Convert the boundary of the mesh with higher priority (the one for which the nodes will be preserved) to a feature polygon (use the right-click menu Convert to feature command).
- Build polygons for the new regions just created in the map coverage.
- Using the Nodes | Options command in the mesh module, make sure the option to retriangulate voids is enabled.
- Select the polygons created in the previous step.
- In the Edit menu, use the Select/Delete Data command to select all the nodes from the low priority mesh that lie inside the high priority mesh. Delete these nodes.
- Now merge the two meshes. The nodes from the low priority mesh that were in the overlap region have been deleted, so they do not appear in the merged mesh.
- Note: If wanting to maintain the original meshes in this process, create a copy of the low priority mesh to edit before performing the steps. This copy can be deleted after the merge process if desired.
- Note: The boundary condition attributes will only be preserved for the mesh given high priority. Boundary condition attributes for the low priority mesh will need to be specified again in the merged mesh.
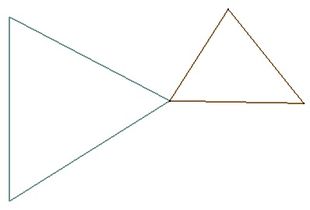
Examples of Meshes that are not considered overlapping
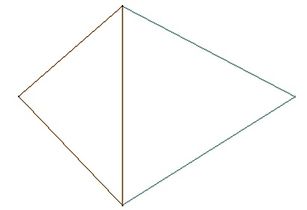
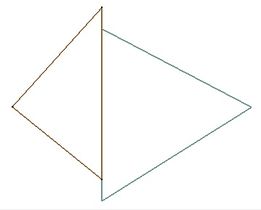
Example 1: Mesh cells that share the same element edge and nodes.
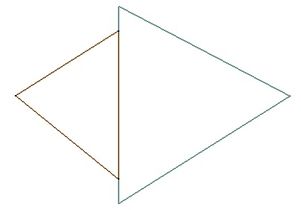
Example 2: Mesh cells that share the same node and do not overlap.
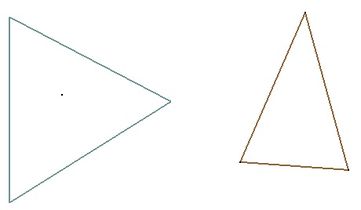
Example 3: Mesh cells that do not overlap.


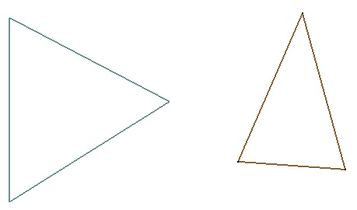
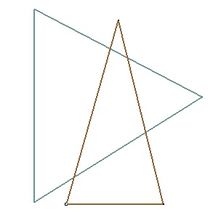
Examples of Meshes that are considered overlapping
Example 1: Mesh cells that are overlapping without no shared nodes.

Example 2: Mesh cells that overlap and share an element edge and nodes.
Example 3: Mesh cells that have common portions of an edge.
Example 4: Mesh cells that have common portions of an edge.
Example 5: Mesh with a disjointed node inside of the second mesh.


Related Topics
SMS – Surface-water Modeling System | ||
|---|---|---|
| Modules: | 1D Grid • Cartesian Grid • Curvilinear Grid • GIS • Map • Mesh • Particle • Quadtree • Raster • Scatter • UGrid |  |
| General Models: | 3D Structure • FVCOM • Generic • PTM | |
| Coastal Models: | ADCIRC • BOUSS-2D • CGWAVE • CMS-Flow • CMS-Wave • GenCade • STWAVE • WAM | |
| Riverine/Estuarine Models: | AdH • HEC-RAS • HYDRO AS-2D • RMA2 • RMA4 • SRH-2D • TUFLOW • TUFLOW FV | |
| Aquaveo • SMS Tutorials • SMS Workflows | ||