UGrid 2D from UGrid 3D Tool
UGrid 2D from UGrid 3D
The UGrid 2D from UGrid 3D tool is used to create a 2D UGrid from the top or bottom of a 3D UGrid, preserving the order of the points and cells. The point and cell numbers in the 2D UGrid may not exactly match the top (or bottom) of the 3D UGrid because the 2D numbering must start at 1, but the order will be the same (see examples below). The user selects a 3D UGrid as input to the tool, selects whether to use the top or the bottom, and, optionally, provides a name for the 2D UGrid that will be created. This tool will only work on UGrids that are made up of 3D cells.
Input parameters
- 3D UGrid – The input 3D UGrid that will be used.
- Top or bottom – Option to use the top or bottom of the 3D UGrid.
- 2D UGrid name – Name of the 2D UGrid that will be created.
Output parameters
- The output is a 2D UGrid.
Current location in Toolbox
Unstructured Grids/2D UGrid from 3D UGrid
Examples
Files for example 1 can be downloaded here.
Example 1
The following figure shows a 3D UGrid with three layers in oblique view.

The next two figures show the numbering of the points and cells on the top of the 3D UGrid, and on the 2D UGrid that would get generated by the tool if the "Top" option is selected. Notice the 2D UGrid numbering happens to match exactly with that of the 3D UGrid because the top points and cells start at one and there are no gaps in the numbering.

Example 1: 3D UGrid top numbering
Example 1: 2D UGrid from selecting "Top"


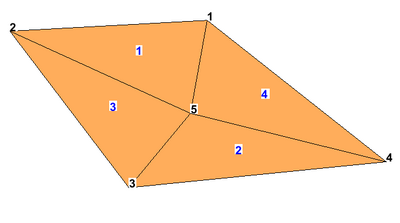
The next two figures show the numbering of the points and cells on the bottom of the 3D UGrid, and on the 2D UGrid that would get generated by the tool if the "Bottom" option is selected. Notice the 2D UGrid numbering differs from the bottom of the 3D UGrid but the order for both points and cells is the same.

Example 1: 3D UGrid bottom numbering
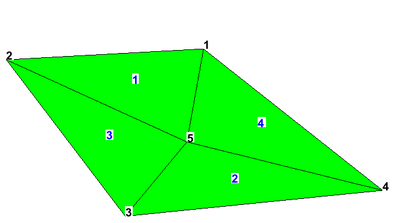
Example 1: 2D UGrid from selecting "Bottom"

