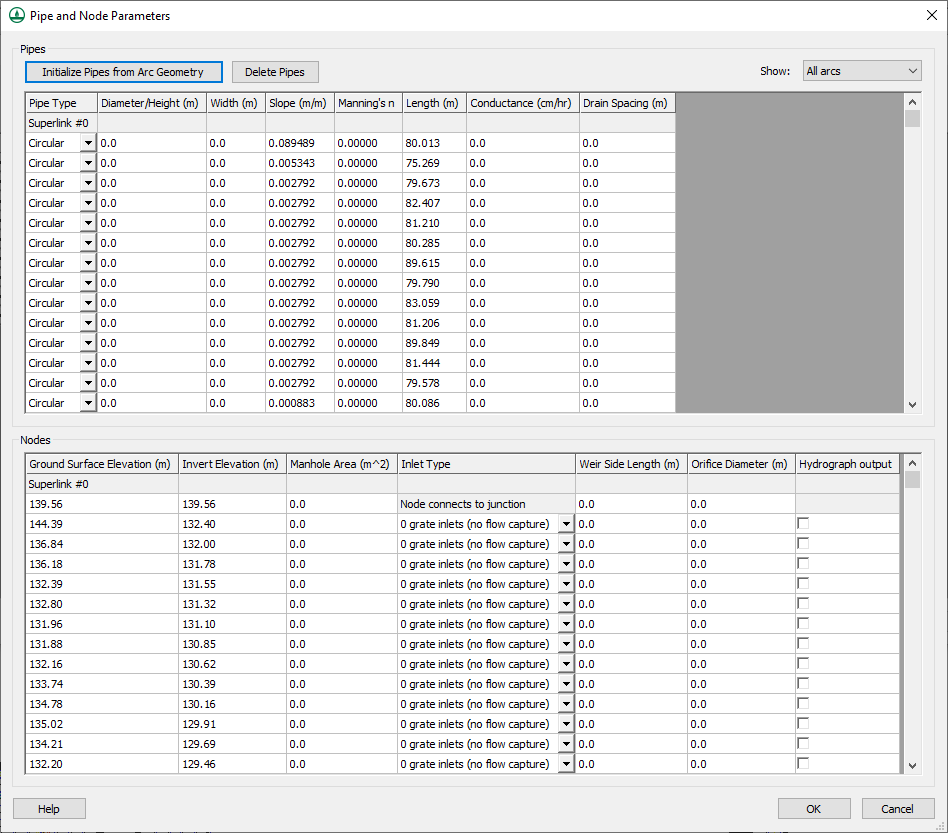
WMS:Pipe and Node Parameters
Overview
The GSSHA Pipe and Node Parameters dialog is accessed by selecting one or more feature arcs, going to the GSSHA Feature Arc Properties dialog, and changing the arc type to Pipe. This dialog is used for building and editing the pipes and nodes associated with Super-Links when running a GSSHA Storm and Tile drain simulation.
Help
When running a GSSHA Storm and Tile drain simulation, it is a good idea to add more than one pipe (2 nodes) between Super-Junctions. In WMS, Super-Links are represented as arcs and Super-Junctions are represented by the 2 nodes at the end of each arc. Each link may contain 1 or more pipes and 2 or more nodes. Many of the attributes between Super-Junctions and nodes between Super-Junctions overlap. In WMS, you define nodes along a Super-Link (between Super-Junctions) by adding vertices along an arc. You can WMS:Redistribute_Vertices on the arc using the Redistribute command or you can manually add vertices along an arc using the Create Vertex tool. Normally, you would follow the following steps to define storm or tile drains and their attributes in WMS:
- Define your storm or tile drain geometry using arcs.
- Define the storm or tile drain attributes for each arc (Super-Link).
- Define the storm or tile drain attributes and pipe invert elevations for the nodes at each end of the arcs (Super-Junctions).
- For each arc (Super-Link), redistribute the vertices along the arc using the redistribute vertices command and/or manually add vertices along each arc. The spacing and number of vertices on an arc define the pipes and nodes on the arc and the lengths and slopes of the pipes.
- Define the attributes of the pipes and nodes for each arc (Super-Link) by going to the GSSHA arc Properties dialog and clicking on the Edit Pipes and Nodes button.
- From the Pipe and Node Parameters dialog, you can Initialize your Pipes from the Arc Geometry. Clicking on this button creates a pipe for each arc segment on your selected arc and creates a node for each node or vertex on the arc. Attributes associated with the Super-Link (arc) and Super-Junctions (arc nodes) are transferred to the generated pipes and nodes, but you are free to edit these transferred data values. Node ground surface elevations are extracted from the 2D grid elevations at the location of each node or vertex on the selected arc. These pipes and nodes are written to the GSSHA Storm Pipe Network (.spn) file when the GSSHA project is written. It is important to define pipe and node parameters for all the pipe arcs in your storm or tile drain network.
Refer to the WMS:WMS_Tutorials for more information about how to setup a storm or tile drain model.
WMS – Watershed Modeling System | ||
|---|---|---|
| Modules: | Terrain Data • Drainage • Map • Hydrologic Modeling • River • GIS • 2D Grid • 2D Scatter |  |
| Models: | CE-QUAL-W2 • GSSHA • HEC-1 • HEC-HMS • HEC-RAS • HSPF • MODRAT • NSS • OC Hydrograph • OC Rational • Rational • River Tools • Storm Drain • SMPDBK • SWMM • TR-20 • TR-55 | |
| Toolbars: | Modules • Macros • Units • Digitize • Static Tools • Dynamic Tools • Drawing • Get Data Tools | |
| Aquaveo | ||
