Import from Web
GMS, SMS, and WMS make use of the Import from Web feature.
Overview
The Import from Web feature connects to the internet to download free data – images, elevation data etc. If able to connect to the internet, this is an easy and convenient way to acquire this type of data.
The data is made available for free by various entities who provide web services. Each of the XMS programs has a number of available data types they can retrieve.
It should be noted that the Import from Web feature links to external internet sites which can change without warning. For example, historically the XMS programs retrieved data from the TerraServer site which was terminated. The termination or modification of an online source may result in invalid links in the XMS program until the links can be corrected.
The Import from Web command is accessed in a number of ways. These include:
- From the File menu.
- From the Get Data From Map
 macro (WMS only).
 - From the Get Data or Import From Web
 tool (All XMS Programs).
In the first two options the XMS program brings up a map locator tool (Virtual Earth) that allows selecting (via pan and zoom) an area of interest and download data for this area (as shown below).
The Get Data tool is available from the data toolbar when the XMS application is using a global projection. When this tool is active in XMS, graphically select a rectangle in the graphics window and download data inside this rectangle.
The XMS programs also have a Get Online Maps tool which can be used to get dynamic raster data, such as image or raster elevation data. The dynamic map is updated automatically when zooming in or out in the graphics window. Any instance of a dynamic map on the screen can be downloaded by right-clicking on the map and selecting the Export command. This command will download the map to the computer.
Available data sources include:
- World Imagery More Info
- World Street Maps More Info
- World Topo Maps More Info
- USA Topo Maps More Info
- Worldwide Elevation Data (Variable Resolution)
- NLCD and CORINE (European) Land Cover data
- USA Flood Hazard Zones
- USA Base Flood Elevation Lines
- Land Use Shapefiles
- STATSGO and SSURGO Soil Type Shapefiles
- Harmonized World Soil Database v 1.1
- Global Land Cover
Data Availability
Elevation (NED, ASTER, and SRTM) Data
- NED data contains the best available raster elevation data of the conterminous United States, Alaska, Hawaii, and territorial islands. NED data are not available for other areas.
- ASTER and SRTM data are available for most of the earth's surface. The ASTER dataset is reliable and high-quality.
Imagery
Most of the imagery (World Imagery, Street Maps, Topo Maps, and OpenStreetMap.org data) are available for anywhere on the earth. Some imagery, such as US Topo Maps, are only available for areas of the United States. Besides downloading these images using the Import from Web command, these images can be read as online maps that change resolution dynamically depending on the location.
Land Cover Data
- The 100 m Resolution CORINE dataset (raster) is available for anywhere in Europe.
- The 30 m NLCD dataset (raster) is only available for the conterminous United States.
- The Land Use Shapefile dataset is available for the entire United States.
- The Global Land Cover dataset is available in 2 degree by 2 degree blocks for the entire world. The following steps were used to convert the Land Use data to a format that can be used for WMS hydrologic modeling:
- Go to the European Space Agency site to download land use data.
- Download the .zip file Globcover2009_V2.3_Global_.zip and unzip this file on the computer.
- Open GLOBCOVER_L4_200901_200912_V2.3.tif in a GIS (such as ArcMap) and convert it to an ESRI raster file. Trim the raster as needed, then convert the raster to a shapefile.
- Convert the file Globcover2009_Legend.xls to a *.dbf file and join this file with the shapefile values to get the land use names and IDs.
Soil Data
- SSURGO soil datasets are available for all available SSURGO survey areas in the United States (as of August 2019).
- A STATSGO soil dataset is available for every state in the United States.
- Data from the Harmonized World Soil Database are available in 2 degree by 2 degree blocks for the entire world. The WMS developers used the following steps to convert the soil data to a format that can be used for WMS hydrologic modeling:
- Download and install the Harmonized World Soil Database program from the Harmonized World Soil Database web site.
- Launch the HWSD Viewer on the computer. The soil data will be copied to the folder c:\program files (x86)\HWSD_v<xxx>\Data where <xxx> is the version of the viewer downloaded. The program may also be installed in c:\program files\<...> if running a 32-bit version of Windows. The following files are contained in this folder:
- The HWSD Raster *.zip file.
- The HWSD DBF file.
- The HWSD_META DBF file.
- Copy the files in the data folder to a writable location on the computer and unzip the HWSD Raster *.zip file.
- Open the .bil file in ArcMap and convert the *.bil file to a shapefile using the IDs.
- Join the HWSD DBF file with the IDs in the shapefile.
- Join the attribute IDs with the HWSD_META DBF file. This gives a shapefile with the soil IDs and various soil attributes that can be used for hydrologic modeling in WMS.
Additional Information
Note that more vector-based soil and land use datasets are available; Contact Aquaveo if interested in adding data from a specific area to the list of available land use or soil data that can be downloaded. A comprehensive list of soil and land use data available for download is located here.
TerraServer images are no longer available because this web service has gone offline.
Using the Import from Web Command
Using the Import from Web command will bring up a number of dialogs as described in the next sections.
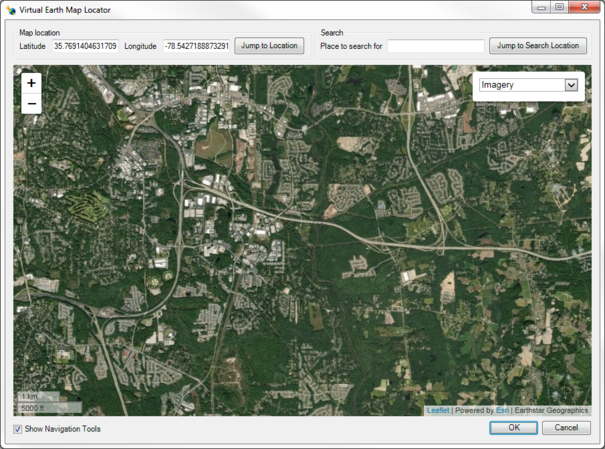
Virtual Earth Map Locator
When the Import from Web command is invoked from a menu or macro, the Virtual Earth Map Locator dialog is launched. The dialog has the following options.
- Virtual Earth Map Locator: Use the map in this dialog to go to the location of interest.
- Search using latitude/longitude coordinates or place name.
- Zoom In
 or Zoom Out
  using the controls or the mouse wheel.
 - Pan by clicking and dragging. It's also possible to enter the latitude and longitude to jump to a specific location.
- Use the drop-down menu to switch between different views. Available views include:
- Topographic
- Streets
- National Geographic
- Oceans
- Gray
- Dark Gray
- Imagery
- Imagery (Clarity)
- Imagery (Firefly)
- Shaded Relief
- Physical
Virtual Earth Map Locator

Using the Add Online Maps menu command or macro will also launch the Virtual Earth Map Locator, but only the first time the command or macro is used in a project. The dialog will not appear if dynamic images are already in the project.
Additional Import Dialogs
Once the region for data download is defined, a series of dialogs appear which defines the data to be downloaded. These dialogs include:
- Data Service Options
- Here select which type of data of interest. The select data will connect to a data server with the requested data type. Use the Advanced button to select additional sources.
- Select Online Source (Optional)
- Contains a list of available data sources and allows adding additional sources. See below for more information.
- Add New Source (Optional)
- Sources can be edited or added using this dialog.
- Save
- A dialog may ask where to save the data. It is only necessary to specify one file name, even if having selected more than one type of data in the Data Service Options dialog. The files will all be given the same prefix but different suffixes.
- Confirm File Creation
- A dialog may ask to confirm creating the files.
- Initialize Connection
- The following dialog is shown while the connection is being made.
- Select Scale
- Smaller numbers (larger scales) will result in better resolution, but longer download times.
- Downloading
- This dialog reports the download progress. If Abort is clicked, the image will exist but will be only that portion that has been downloaded so far.
Steps will repeat for each data type selected.
After everything is finished, the data (images, etc.) will appear in the Project Explorer.
-
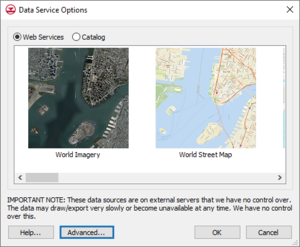 The Data Service Options dialog
 -
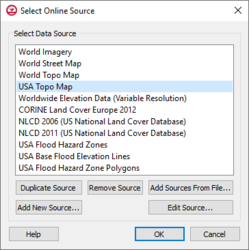 The Select Online Source dialog
 -
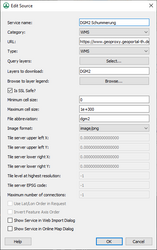 The Add New Source dialog

Advanced Options
|
|
Please Note: Using the Advanced option requires very specific and detailed knowledge about the source data. If you need assistance with what to place in each field, you will need to contact the source data provider. Aquaveo is unable to provide any technical support beyond the documentation in this section. |
Clicking the Advanced button in the Get Online Maps dialog will bring up the Select Online Source dialog. A list of available sources is shown in this dialog. Sources can be added or edited through this dialog.

Options include:
- Duplicate Source – Creates a copy of the selected data source in the list above.
- Remove Source – Deletes the selected user-defined data source from the list above. Built-in sources cannot be removed.
- Add Sources from File – Brings up a browser where an online data source file (*.csv) can be selected to add a source to the available source list. When new data sources are added in the XMS software, a .csv file on your local computer is modified to include information on the new data source. The .csv files are saved in the user's "Roaming" directory (such as C:\Users\<username>\AppData\Roaming\Aquaveo\SMS 13.X) and can be copied from this directory, edited using a text editor, and passed to other users.
- Add New Source – Brings up the Add New Source dialog.
- Edit Source – Brings up the Add New Source dialog which allows editing an existing source. Built-in sources cannot be edited, but you can view information about the built-in data source and duplicate and edit the duplicated data source if desired.
The Add New Source dialog is used when adding a new source and when editing an existing source.

The dialog has the following options:
- Service name – Allows entering or changing the name for the source.
- Category – Select the data source web service catagory. Can be Web Map Services (WMS), Web Feature Services (WFS), or Terrain Tile Services (TTS). WMS services are normally image data with Red, Green, and Blue bands unless the type of raster is an index map, in which case the WMS will download a single-band image with a lookup table to determine RGB values. WFS services download vector GIS data (point, arc, or polygon shapefiles). The only type of TTS service supported by XMS includes the Worldwide Elevation Data web service.
- URL – Specifies the URL of the data source. For a Web Map Service (WMS) data source, this is the location of the WMS service and includes the version number. For example, it might be in the format https://www.mrlc.gov/geoserver/mrlc_display/ows?service=wms&version=1.1.1 for a WMS service.
- Type – Specifies the type source for online data sources in the WMS category of services. The available options are ArcGIS REST (AGS), OGC Web Map Service (WMS), and Tile Map Service (TMS).
- Query layers – This shows a list of available layers from the web service. The layer can be selected from the list and, when you click the OK button, the layer information is entered into the Layers to download field.
- Layers to download – For sources containing layers (WMS and WFS), which layers to download can be specified here.
- Browse to layer legend – This button brings up a web page containing the legend for the specified web service.
- Is SSL Safe? – Check this if the data source server is SSL safe. This tells XMS to skip SSL certificate verification. This option may be needed if the server is using a self signed certificate. Many secure servers will require that this option is turned on.
- Minimum cell size – Sets a minimum cell size for data downloaded from the source. Data with cell sizes below this value will not be downloaded.
- Maximum cell size – Sets a maximum cell size for data downloaded from the source. Data with cell sizes above this value will not be downloaded.
- File abbreviation – Determines the file abbreviation that will be affixed to the file name when the file is downloaded from the web service.
- Image format – Determines the file format used to request data from the data source. The TIFF and PNG formats are available.
- Tile server upper left X – (only used for images downloaded with a WMS Category and TMS Type) The upper left X-coordinate of the tile server data, in the tile server's coordinate system.
- Tile server upper left Y – (only used for images downloaded with a WMS Category and TMS Type) The upper left Y-coordinate of the tile server data, in the tile server's coordinate system.
- Tile server lower right X – (only used for images downloaded with a WMS Category and TMS Type) The lower right X-coordinate of the tile server data, in the tile server's coordinate system.
- Tile server lower right Y – (only used for images downloaded with a WMS Category and TMS Type) The lower right Y-coordinate of the tile server data, in the tile server's coordinate system.
- Tile level at highest resolution – (only used for images downloaded with a WMS Category and TMS Type) The highest resolution tile level available for the specified TMS web service.
- Tile server EPSG code – (only used for images downloaded with a WMS Category and TMS Type) The EPSG code used by the TMS web service.
- Maximum number of connections – (only used for images downloaded with a WMS Category and TMS Type) Maximum number of simultaneous connections to the TMS web service.
- Use Lat/Lon Order in Request – (only used for data downloaded with a WFS Category) Whether to send the WFS request in Latitude (Y)/Longitude (X) order or Longitude (Y)/Latitude (X) order. If this option is turned on, the coordinates are sent to the WFS server in Latitude/Longitude order.
- Invert Feature Axis Order – (only used for data downloaded with a WFS Category) When data is downloaded from a WFS service, it is always converted to a shapefile before XMS reads the file. Sometimes, the X and Y coordinates are inverted in the WFS-downloaded data (the coordinates are listed in Lat/Lon order instead of the traditional Lon/Lat order) and the coordinates need to be inverted in the shapefile before being imported into XMS so the data shows up in the correct location. Turning this option on tells XMS to invert the axis order when converting the data to a shapefile.
- Show Service in Web Import Dialog – This option tells the XMS program to display the service in the web import (Data Service Options) dialog. The next time the Data Service Options dialog appears, this data source becomes available as an icon in the dialog.
- Show Service in Online Map Dialog – This option tells the XMS program to display the service in the Get Online Maps dialog. The option to make a map an online map is only available for data sources with WMS specified as the category.