SMS:Data Transform: Difference between revisions
From XMS Wiki
Jump to navigationJump to search
mNo edit summary |
No edit summary |
||
| (16 intermediate revisions by the same user not shown) | |||
| Line 1: | Line 1: | ||
{{SMS_at_a_glance_data_transform|Heading====At a glance===}} | {{SMS_at_a_glance_data_transform|Heading====At a glance===}} | ||
The Transform command is used to move scatter points. | The '''Transform''' command is used to move scatter points. A prompt will ask what will be transformed: the active set or all sets. In the dialog that appears, the transformation type can be chosen and then appropriate parameters can be entered. The following transformation types are available: | ||
* | * ''Scaling'': Scaling factors for the X, Y, and/or Z directions are entered. To prevent scaling a specific direction, the default value of 1.0 should be used. | ||
* | * ''Translation'': Translation values for the X, Y, and/or Z directions are entered. To prevent translation in a specific direction, the default value of 0.0 should be used. | ||
* | * ''Rotations'': When rotation is selected, the set of options on the right side of the dialog become available to define the center of rotation. If the ''Specified Point'' option is used, then the center of rotation is explicitly defined. Otherwise, after clicking the '''OK''' button from the ''Nodes Transform'' dialog, it's necessary to click in the graphics window at the point or on the node about which the rotation should occur. The rotation will occur counter-clockwise by the specified angle around the specified center of rotation. | ||
* | * ''Datum Conversions'': Convert between elevation and depth data. | ||
By default, the image will be framed after the | By default, the image will be framed after the transformation takes place. However, this can be turned off by using the ''Frame Image After Transformation'' option. | ||
The ''Transform Feature Objects'' dialog can be reached either through the [[SMS:Map_Feature_Objects_Menu#General_Commands|''Feature Objects'']] menu or through the right-click menu of the selected feature object. | |||
==Related Topics== | ==Related Topics== | ||
* [[SMS:Scatter Data Menu|Scatter Data Menu]] | * [[SMS:Scatter Data Menu|Scatter Data Menu]] | ||
* [[SMS:Map Feature Objects Menu|Map Feature Objects Menu]] | |||
{{Template: | {{Template:Navbox SMS}} | ||
[[Category:SMS Scatter| | [[Category:SMS Scatter|D]] | ||
[[Category:SMS Scatter Dialogs]] | |||
[[Category:SMS Tools|D]] | |||
[[Category:Datasets|Data]] | |||
[[Category:Projections]] | |||
[[Category:Projection Dialogs]] | |||
Latest revision as of 15:36, 19 October 2017
At a glance
- Data can be scaled, translated, rotated
- Depths/elevations can be converted back and forth
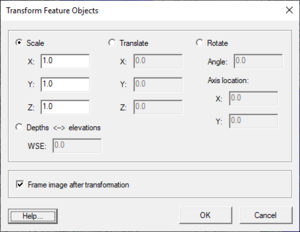
The Transform command is used to move scatter points. A prompt will ask what will be transformed: the active set or all sets. In the dialog that appears, the transformation type can be chosen and then appropriate parameters can be entered. The following transformation types are available:
- Scaling: Scaling factors for the X, Y, and/or Z directions are entered. To prevent scaling a specific direction, the default value of 1.0 should be used.
- Translation: Translation values for the X, Y, and/or Z directions are entered. To prevent translation in a specific direction, the default value of 0.0 should be used.
- Rotations: When rotation is selected, the set of options on the right side of the dialog become available to define the center of rotation. If the Specified Point option is used, then the center of rotation is explicitly defined. Otherwise, after clicking the OK button from the Nodes Transform dialog, it's necessary to click in the graphics window at the point or on the node about which the rotation should occur. The rotation will occur counter-clockwise by the specified angle around the specified center of rotation.
- Datum Conversions: Convert between elevation and depth data.
By default, the image will be framed after the transformation takes place. However, this can be turned off by using the Frame Image After Transformation option.
The Transform Feature Objects dialog can be reached either through the Feature Objects menu or through the right-click menu of the selected feature object.
Related Topics
SMS – Surface-water Modeling System | ||
|---|---|---|
| Modules: | 1D Grid • Cartesian Grid • Curvilinear Grid • GIS • Map • Mesh • Particle • Quadtree • Raster • Scatter • UGrid |  |
| General Models: | 3D Structure • FVCOM • Generic • PTM | |
| Coastal Models: | ADCIRC • BOUSS-2D • CGWAVE • CMS-Flow • CMS-Wave • GenCade • STWAVE • WAM | |
| Riverine/Estuarine Models: | AdH • HEC-RAS • HYDRO AS-2D • RMA2 • RMA4 • SRH-2D • TUFLOW • TUFLOW FV | |
| Aquaveo • SMS Tutorials • SMS Workflows | ||
