WMS:Project Explorer Contents for River Module: Difference between revisions
No edit summary |
No edit summary |
||
| (3 intermediate revisions by the same user not shown) | |||
| Line 1: | Line 1: | ||
The Project Explorer contents for the river module include hydraulic schematics, cross sections, reaches, links, and nodes. Cross sections and reaches are used with HEC-RAS and SMPBDK models. Links and nodes are used in SWMM models. | The Project Explorer contents for the river module include hydraulic schematics, cross sections, reaches, links, and nodes. Cross sections and reaches are used with HEC-RAS and SMPBDK models. Links and nodes are used in SWMM models. | ||
Right-clicking on a hydraulic schematic [[File:Hydraulic Folder Icon.svg|16 px]] gives several options. The available options | Right-clicking on a hydraulic schematic [[File:Hydraulic Folder Icon.svg|16 px]] gives several options. The available options change depending on the type of model being used. For example, right-clicking on a SWMM schematic brings up the following menu: | ||
:[[Image:SWMMHydraulicSchematicMenuOptions.png|thumb]] | |||
*'''Display Options''': Brings up the [[WMS:Display Options|''Display Options'']] dialog. | |||
*'''Import XPX File''': | |||
*'''Export XPX File''': | |||
*'''Run xpswmm''': | |||
*'''Import EPA SWMM File''': | |||
*'''Export EPA SWMM File''': | |||
*'''Run EPA SWMM''': | |||
*'''Properties''': | |||
*'''Assign Ground Elevations''': | |||
*'''Link Outlet to Nodes''': | |||
*'''Delete''': Removes the hydraulic schematic from the project. | |||
*'''Rename''': Lets the name of the hydraulic schematic be changed in the Project Explorer. | |||
*'''Find''': | |||
*'''Map→1D Schematic''': | |||
*'''Zoom To Schematic''': | |||
Right-clicking on cross sections [[File:HydraulicCrossSection.svg|14 px]], reaches [[File:HydraulicReach.svg|14 px]], links [[File:HydraulicLink.svg|14 px]], or nodes [[File:HydraulicNode.svg|14 px]] either from the Project Explorer window or from the Graphics Window brings up a menu similar to the following: | Right-clicking on cross sections [[File:HydraulicCrossSection.svg|14 px]], reaches [[File:HydraulicReach.svg|14 px]], links [[File:HydraulicLink.svg|14 px]], or nodes [[File:HydraulicNode.svg|14 px]] either from the Project Explorer window or from the Graphics Window brings up a menu similar to the following: | ||
:[[Image:SWMMLinkMenuOptions.png]] | :[[Image:SWMMLinkMenuOptions.png]] | ||
*'''Edit Parameters''': Brings up the [[WMS:HEC-1 Parameters| Edit HEC-1 Parameters]] dialog. | |||
*'''Rename''': Lets the name of the selected object to be changed in the Project Explorer. | |||
*'''Delete''': Removes the selected object from the project. | |||
*'''Zoom to Object''': Will resize the Graphics Window for a better view of the selected object. | |||
If making a change to the map data (arcs) used to generate the hydraulic schematic, just re-generate the schematic from the by right-clicking on the hydraulic schematic and selecting the [[WMS:Storm Drain#Storm Drain Menu|'''Map→1D Schematic''' menu item]]. | If making a change to the map data (arcs) used to generate the hydraulic schematic, just re-generate the schematic from the by right-clicking on the hydraulic schematic and selecting the [[WMS:Storm Drain#Storm Drain Menu|'''Map→1D Schematic''' menu item]]. | ||
Latest revision as of 19:56, 26 December 2019
The Project Explorer contents for the river module include hydraulic schematics, cross sections, reaches, links, and nodes. Cross sections and reaches are used with HEC-RAS and SMPBDK models. Links and nodes are used in SWMM models.
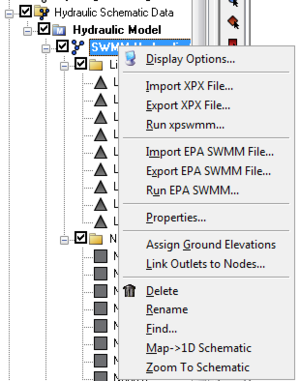
Right-clicking on a hydraulic schematic ![]() gives several options. The available options change depending on the type of model being used. For example, right-clicking on a SWMM schematic brings up the following menu:
gives several options. The available options change depending on the type of model being used. For example, right-clicking on a SWMM schematic brings up the following menu:
- Display Options: Brings up the Display Options dialog.
- Import XPX File:
- Export XPX File:
- Run xpswmm:
- Import EPA SWMM File:
- Export EPA SWMM File:
- Run EPA SWMM:
- Properties:
- Assign Ground Elevations:
- Link Outlet to Nodes:
- Delete: Removes the hydraulic schematic from the project.
- Rename: Lets the name of the hydraulic schematic be changed in the Project Explorer.
- Find:
- Map→1D Schematic:
- Zoom To Schematic:
Right-clicking on cross sections ![]() , reaches
, reaches ![]() , links
, links ![]() , or nodes
, or nodes ![]() either from the Project Explorer window or from the Graphics Window brings up a menu similar to the following:
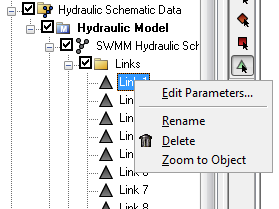
either from the Project Explorer window or from the Graphics Window brings up a menu similar to the following:
- Edit Parameters: Brings up the Edit HEC-1 Parameters dialog.
- Rename: Lets the name of the selected object to be changed in the Project Explorer.
- Delete: Removes the selected object from the project.
- Zoom to Object: Will resize the Graphics Window for a better view of the selected object.
If making a change to the map data (arcs) used to generate the hydraulic schematic, just re-generate the schematic from the by right-clicking on the hydraulic schematic and selecting the Map→1D Schematic menu item.
WMS – Watershed Modeling System | ||
|---|---|---|
| Modules: | Terrain Data • Drainage • Map • Hydrologic Modeling • River • GIS • 2D Grid • 2D Scatter |  |
| Models: | CE-QUAL-W2 • GSSHA • HEC-1 • HEC-HMS • HEC-RAS • HSPF • MODRAT • NSS • OC Hydrograph • OC Rational • Rational • River Tools • Storm Drain • SMPDBK • SWMM • TR-20 • TR-55 | |
| Toolbars: | Modules • Macros • Units • Digitize • Static Tools • Dynamic Tools • Drawing • Get Data Tools | |
| Aquaveo | ||

