WMS:Long Term Simulation Dialog
From XMS Wiki
Jump to navigationJump to search
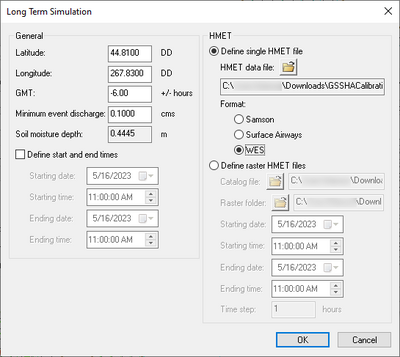
The Long Term Simulation dialog allows for setting options for long term simulation running in GSSHA. It has the following sections and options:
- General
- Latitude – The latitude in decimal degrees.
- Longitude – The longitude in decimal degrees.
- GMT – The difference between local time and Greenwich Mean Time (expressed in positive or negative hours)
- Minimum event discharge – A decimal value in cubic meters per second (m3/s).
- Soil moisture depth – A decimal value in meters.
- Define start and end times – Turn on to activate the four options below:
- Starting date – Manually enter the starting date or use the small drop-down to select it from a calendar.
- Starting time – Manually type in the starting time or use the
 buttons to scroll to the desired time.
 - Ending date – Manually enter the ending date or use the small drop-down to select it from a calendar.
- Ending time – Manually type in the ending time or use the
 buttons to scroll to the desired time.
- HMET – Use this section to define the distributed hydrometeorology (HMET) information.
- Define single HMET file –
- HMET data file – Click
 to bring up the Open dialog and select the desired HMET definition file.
 - Format – Select the format of the HMET file from the following options:
- Samson – This is an ASCII file with hourly HMET data formatted as per the NOAA/NCDC SAMSON CD-ROM data set. This set contains historical data from 1961-1990.
- Surface Airways – Newer NCDC data that contain numerous data parameters in addition to the seven required inputs.
- WES – An ASCII text format containing only the data required by the model for the simulation.
- HMET data file – Click
- Define raster HMET files –
- Catalog file – Click
 to bring up the Choose the HMET Raster Catalog File Name dialog.
 - Raster folder – Click
 to bring up the Browse For Folder dialog. Select the folder containing the raster HMET files.
 - Starting date – Manually enter the starting date or use the small drop-down to select it from a calendar.
- Starting time – Manually type in the starting time or use the
 buttons to scroll to the desired time.
 - Ending date – Manually enter the ending date or use the small drop-down to select it from a calendar.
- Ending time – Manually type in the ending time or use the
 buttons to scroll to the desired time.
 - Time step – An integer value in hours.
- Catalog file – Click
- Define single HMET file –
| [hide] GSSHA | |
|---|---|
| XMS Wiki Links | Calibration (Automated • Manual • Output) • Channel Routing • Contaminants • Digital Dams • Embankment Arcs • Feature Objects (Arcs • Nodes • Polygons) • File Types • Groundwater • Groups • Hydraulic Structures • Job Control • Join SSURGO Data • Mapping Tables • Maps • Menu • Model Linkage • Multiple Simulations • Nutrients • Observations • Output Control • Overland Soil Erosion • Pipe and Node Parameters • Precipitation • Radar Rainfall • Save GSSHA Project File • Smooth GSSHA Streams • Snowmelt • Solution (Analysis • Data) |
| Related Tools | MWBM Wizard • Using Soil Type Data with GSSHA |
| GSSHA Wiki External Links | GSSHA Wiki: Overview • Primer • User's Manual • Tutorials |
| [hide] WMS – Watershed Modeling System | ||
|---|---|---|
| Modules: | Terrain Data • Drainage • Map • Hydrologic Modeling • River • GIS • 2D Grid • 2D Scatter |  |
| Models: | CE-QUAL-W2 • GSSHA • HEC-1 • HEC-HMS • HEC-RAS • HSPF • MODRAT • NSS • OC Hydrograph • OC Rational • Rational • River Tools • Storm Drain • SMPDBK • SWMM • TR-20 • TR-55 | |
| Toolbars: | Modules • Macros • Units • Digitize • Static Tools • Dynamic Tools • Drawing • Get Data Tools | |
| Aquaveo | ||
