SMS:Cartesian Grid Data Menu: Difference between revisions
| (56 intermediate revisions by 2 users not shown) | |||
| Line 1: | Line 1: | ||
{{ | {{TOCright}} | ||
Most of the SMS modules have a ''Data'' menu, but the items in this menu are different for each module. | |||
The Cartesian grid module ''Data'' menu commands include: | |||
* [[SMS:Steering | '''Steering Module''']] – Launches the steering tool. | |||
* [[SMS:Dataset Toolbox|'''Dataset Toolbox''']] – Contains tools for working with datasets. Includes the [[SMS:Data Calculator|''Data Calculator'']]. | |||
* [[SMS:Cartesian Grid Module#Current_Numerical_Model|'''Switch Current Model''']] – Changes current active model. | |||
* [[SMS:Vector Display Options| '''Vector Options''']] – Opens a dialog where options to generate vectors can be edited. | |||
* [[SMS:Contour Options| '''Contour Options''']] – Opens a dialog where dataset specific contour options can be defined. | |||
* '''Set Contour Min/Max''' – This command sets the contour options based on the current options and the selected nodes/vertices or zoom level. | |||
* '''Contour Range Options''' – This controls if the '''Set Contour Min/Max''' command applies to dataset specific contour options or the general contour options (for the mesh or scatter modules). It also sets the flags for precision and fill above and below. | |||
* [[SMS:Animations |''' Film Loop''']] – Opens the ''Film Loop Setup'' wizard. | |||
* [[SMS:Cartesian Grid Data Menu#Grid to Scatterpoint|'''Grid → Scatterpoint''']] – Converts grid data into the scatter module. | |||
* [[SMS:Cartesian Grid Data Menu#Grid to Map|'''Grid → Map''']] – Converts grid data into a map coverage. | |||
* [[SMS:Cartesian Grid Data Menu#Grid to Mesh|'''Grid → Mesh''']] – Converts grid data into the mesh module. | |||
* [[SMS:Cartesian Grid Data Menu#Find Cell|'''Find Cell''']] – Used to locate a cell either with a specific i,j location, or near a specific location. | |||
* [[SMS:Mesh_Data_Menu#Map_Elevation|'''Map Elevation''']] – Allows use of another functional dataset as the mapped elevation function. | |||
* [[SMS:Zonal Classification|'''Zonal Classification''']] – Tool to identify areas that meet as set of criteria. | |||
== Model | ==Model Specific Menus== | ||
* [[SMS: | The following models have specific commands included in the ''Data'' menu. | ||
* [[SMS: | * [[SMS:BOUSS-2D Graphical Interface#BOUSS-2D Menu|BOUSS-2D ]] | ||
* [[SMS:CMS-Wave Menu|CMS-Wave ]] | |||
* [[SMS:TUFLOW|TUFLOW ]] | |||
* [[SMS:WAM|WAM]] | |||
== | == Data Conversion Commands == | ||
===Grid to Scatterpoint=== | |||
The '''Grid → Scatter''' command in the ''Data'' menu (Cartesian grid module) is equivalent to the '''2D Grid → 2D Scatter''' command in the right-click menu on a grid object in the Project Explorer. It is used to convert the grid cell corners into a scattered dataset (scatter module). | |||
Each cell corner in the grid is converted to a scatter vertex. SMS computes one dataset from the elevation dataset of the grid and one dataset for each functional dataset on the grid. If the Cartesian grid is cell centered (data at the center of the cell), SMS averages the values of the four surrounding cells to compute a value for the scatter set vertex. If the Cartesian grid is a mesh centered grid (BOUSS2D), SMS assigns the value from the cell corner to the scattered vertex. | |||
Each cell in the grid is converted to two triangles in a TIN. | |||
This command allows the visualization of the data on a matching geometric object. | |||
===Grid to Map=== | |||
[[File:Grid to Map.png|thumb|230 px|The ''Grid → Map'' dialog]] | |||
The '''Grid → Map''' command in the ''Data'' menu (Cartesian grid module) is equivalent to the '''2D Grid → Map''' command in the right-click menu on a grid object in the Project Explorer. It is used to convert attributes of the Cartesian grid into feature objects on a coverage (map module). All generated features are added to the current or active coverage. If a new coverage is desired, it should be created prior to issuing this command. | |||
The command includes the following options: | |||
====Land/Water Boundary → Arcs==== | |||
This option only applies to Cartesian grids which support cell attributes supporting land and water cells (CMS-Flow). When this option is selected, the cell faces between cells of these opposing types are converted to feature arcs. For grid cells that do not support cell attributes, this options functions identically to the ''Grid Boundary → Arcs'' option. | |||
====Grid Boundary → Arcs==== | |||
This option generates a feature arc along all cell edges of the boundary of the Cartesian grid. | |||
==== Observation Cells → Points==== | |||
This option can be applied to either arc generation option above. It only applies to Cartesian grids that support the cell attribute of observation cells. If this toggle is selected, a feature point is created at the centroid of each cell with the observation point attribute. | |||
This command has minimal usefulness since the feature objects generated are step functions. It is recommended that other data sources, such as a scatter set or a shapefile be used to define these features, but if only the numerical model exists, this command can be used to help construct a conceptual model. | |||
== | ===Grid to Mesh=== | ||
The '''Grid → Mesh''' command in the ''Data'' menu (Cartesian grid module) is equivalent to the '''2D Grid → 2D Mesh''' command in the right-click menu on a grid object in the Project Explorer. It is used to convert the grid cell corners into a mesh or unstructured grid object (mesh module). | |||
== | Each cell corner in the grid is converted to a mesh node. SMS computes an elevation for the mesh node as the average of the four surrounding cells in the grid for cell centered grids, or the elevation of the corner for mesh centered grids. | ||
Each cell in the grid is converted to two triangular elements. | |||
* [[SMS: | |||
This command allows the visualization of the data on a matching geometric object. | |||
==Switch Current Model== | |||
The '''Switch Current Model''' command brings up a ''Select Current Model'' dialog. This dialog can only be used when a grid does not currently exist. | |||
[[File:SelectCurrentModel.png|thumb|none|The ''Select Current Model'' dialog]] | |||
==Find Cell== | |||
[[File:FindCell.png|thumb|175 px|The ''Find Cell'' dialog]] | |||
The '''Find Cell''' command from the ''Data'' menu is used to locate a cell either with a specific i,j location, or near a specific location. When this command is executed the ''Find Cell'' dialog opens. | |||
When the ''Find by (I,J)'' option is selected, the cell with the specified ''i,j'' is highlighted in red. If there is no cell with the specified ''i,j'', an error message is given. Conversely, when the ''Find by nearest (x,y) coordinates'' option is selected, the cell containing the specified coordinate is highlighted with red. If no cell contains the ''x,y'' location, an error message is given. With either of these methods, the found cell becomes selected in addition to being highlighted. | |||
==Obsolete Commands== | |||
* [[SMS:Create Datasets|Create Datasets]] – Opens a dialog that can be used to create functions for the entire mesh or active scatter set. No longer available as of SMS 10.1. Replaced by the [[SMS:Dataset Toolbox|''Dataset Toolbox'']]. | |||
== Related Topics == | == Related Topics == | ||
* [[SMS:Cartesian Grid Module|Cartesian Grid Module]] | * [[SMS:Cartesian Grid Module|Cartesian Grid Module]] | ||
{{Template:Navbox SMS Menus}} | {{Template:Navbox SMS Menus}} | ||
| Line 35: | Line 83: | ||
{{Template:Navbox SMS}} | {{Template:Navbox SMS}} | ||
[[Category:SMS Menus| | [[Category:SMS Menus|C]] | ||
[[Category:SMS Cartesian Grid|D]] | |||
[[Category:2D Grid Dialogs]] | |||
[[Category:Needs Update]] | |||
Latest revision as of 20:10, 22 March 2022
Most of the SMS modules have a Data menu, but the items in this menu are different for each module.
The Cartesian grid module Data menu commands include:
- Steering Module – Launches the steering tool.
- Dataset Toolbox – Contains tools for working with datasets. Includes the Data Calculator.
- Switch Current Model – Changes current active model.
- Vector Options – Opens a dialog where options to generate vectors can be edited.
- Contour Options – Opens a dialog where dataset specific contour options can be defined.
- Set Contour Min/Max – This command sets the contour options based on the current options and the selected nodes/vertices or zoom level.
- Contour Range Options – This controls if the Set Contour Min/Max command applies to dataset specific contour options or the general contour options (for the mesh or scatter modules). It also sets the flags for precision and fill above and below.
- Film Loop – Opens the Film Loop Setup wizard.
- Grid → Scatterpoint – Converts grid data into the scatter module.
- Grid → Map – Converts grid data into a map coverage.
- Grid → Mesh – Converts grid data into the mesh module.
- Find Cell – Used to locate a cell either with a specific i,j location, or near a specific location.
- Map Elevation – Allows use of another functional dataset as the mapped elevation function.
- Zonal Classification – Tool to identify areas that meet as set of criteria.
Model Specific Menus
The following models have specific commands included in the Data menu.
Data Conversion Commands
Grid to Scatterpoint
The Grid → Scatter command in the Data menu (Cartesian grid module) is equivalent to the 2D Grid → 2D Scatter command in the right-click menu on a grid object in the Project Explorer. It is used to convert the grid cell corners into a scattered dataset (scatter module).
Each cell corner in the grid is converted to a scatter vertex. SMS computes one dataset from the elevation dataset of the grid and one dataset for each functional dataset on the grid. If the Cartesian grid is cell centered (data at the center of the cell), SMS averages the values of the four surrounding cells to compute a value for the scatter set vertex. If the Cartesian grid is a mesh centered grid (BOUSS2D), SMS assigns the value from the cell corner to the scattered vertex.
Each cell in the grid is converted to two triangles in a TIN.
This command allows the visualization of the data on a matching geometric object.
Grid to Map
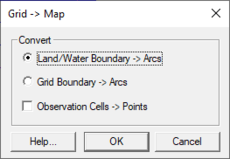
The Grid → Map command in the Data menu (Cartesian grid module) is equivalent to the 2D Grid → Map command in the right-click menu on a grid object in the Project Explorer. It is used to convert attributes of the Cartesian grid into feature objects on a coverage (map module). All generated features are added to the current or active coverage. If a new coverage is desired, it should be created prior to issuing this command.
The command includes the following options:
Land/Water Boundary → Arcs
This option only applies to Cartesian grids which support cell attributes supporting land and water cells (CMS-Flow). When this option is selected, the cell faces between cells of these opposing types are converted to feature arcs. For grid cells that do not support cell attributes, this options functions identically to the Grid Boundary → Arcs option.
Grid Boundary → Arcs
This option generates a feature arc along all cell edges of the boundary of the Cartesian grid.
Observation Cells → Points
This option can be applied to either arc generation option above. It only applies to Cartesian grids that support the cell attribute of observation cells. If this toggle is selected, a feature point is created at the centroid of each cell with the observation point attribute.
This command has minimal usefulness since the feature objects generated are step functions. It is recommended that other data sources, such as a scatter set or a shapefile be used to define these features, but if only the numerical model exists, this command can be used to help construct a conceptual model.
Grid to Mesh
The Grid → Mesh command in the Data menu (Cartesian grid module) is equivalent to the 2D Grid → 2D Mesh command in the right-click menu on a grid object in the Project Explorer. It is used to convert the grid cell corners into a mesh or unstructured grid object (mesh module).
Each cell corner in the grid is converted to a mesh node. SMS computes an elevation for the mesh node as the average of the four surrounding cells in the grid for cell centered grids, or the elevation of the corner for mesh centered grids.
Each cell in the grid is converted to two triangular elements.
This command allows the visualization of the data on a matching geometric object.
Switch Current Model
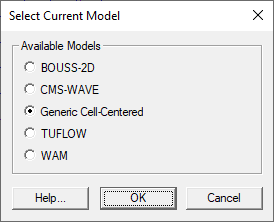
The Switch Current Model command brings up a Select Current Model dialog. This dialog can only be used when a grid does not currently exist.
Find Cell
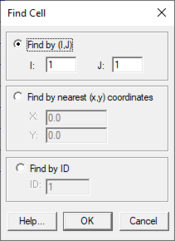
The Find Cell command from the Data menu is used to locate a cell either with a specific i,j location, or near a specific location. When this command is executed the Find Cell dialog opens.
When the Find by (I,J) option is selected, the cell with the specified i,j is highlighted in red. If there is no cell with the specified i,j, an error message is given. Conversely, when the Find by nearest (x,y) coordinates option is selected, the cell containing the specified coordinate is highlighted with red. If no cell contains the x,y location, an error message is given. With either of these methods, the found cell becomes selected in addition to being highlighted.
Obsolete Commands
- Create Datasets – Opens a dialog that can be used to create functions for the entire mesh or active scatter set. No longer available as of SMS 10.1. Replaced by the Dataset Toolbox.
Related Topics
SMS Menu Bars | |
|---|---|
| Standard Menus: | File • Edit • Display • Window • Help |
| Module Menus: | 2D Mesh • Cartesian Grid • Curvilinear Grid • GIS • Map • Particle • Quadtree • Raster • Scatter |
| Model Menus: | ADCIRC • BOUSS-2D • CGWAVE • CMS-Flow • CMS-Wave • FESWMS • Generic Model • GenCade • PTM • RMA2 • RMA4 • SRH-2D • STWAVE • TUFLOW |
SMS – Surface-water Modeling System | ||
|---|---|---|
| Modules: | 1D Grid • Cartesian Grid • Curvilinear Grid • GIS • Map • Mesh • Particle • Quadtree • Raster • Scatter • UGrid |  |
| General Models: | 3D Structure • FVCOM • Generic • PTM | |
| Coastal Models: | ADCIRC • BOUSS-2D • CGWAVE • CMS-Flow • CMS-Wave • GenCade • STWAVE • WAM | |
| Riverine/Estuarine Models: | AdH • HEC-RAS • HYDRO AS-2D • RMA2 • RMA4 • SRH-2D • TUFLOW • TUFLOW FV | |
| Aquaveo • SMS Tutorials • SMS Workflows | ||


